

A Drawing tutorial that covers essential information on how to draw the human figure.
So the human figure, in all its complications one of the hardest things to draw! And it’ll take years to master, but there are ways to make it easier to draw figures with charm and accuracy.
There are techniques we can use to help push our imagination and be more mindful about what we’re drawing, and how to best communicate the message. We can start by understanding some gesture drawing techniques inspired by the Alex Woo Gesture Drawing Class at schoolism.com to get you thinking when drawing figures, and how to improve your imagination.
When drawing figures and poses within a setting or environment, we have to always ask ourselves:
‘What are we trying to communicate?’ and ‘what’s the best way to communicate it’...
Gesture Drawing Techniques
Gesture drawing focuses mostly on the mood and feeling of a drawing, so you don't need to worry too much about correct anatomy just yet. We want to explore the main ideas behind the pose, to capture the heart and soul!
Below are some key gestural practices to help focus on the emotion and main idea of a drawing.
Line of Action
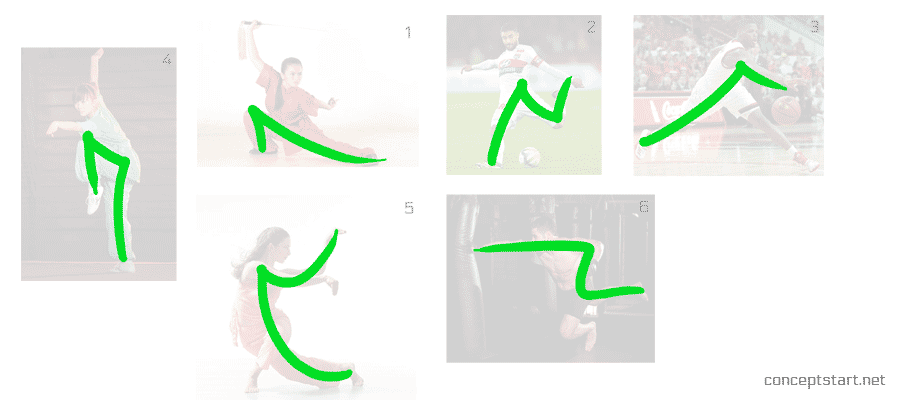
OK! The first in the gestural figure drawing practices is the line of action. This is basically a solid graphical line that runs through a pose to suggest the energy and flow contained within it.
It sums up the attitude of the form and captures the essence very quickly. From this line we can begin to build up a figure that is full of energy and movement.
The line of action helps us to understand the main idea behind the pose. So to find the line of action in a pose we must first ask ourselves what’s the main idea that we’re trying to express.
By taking existing images of poses and finding the line of action that runs through them, we can learn how to create dynamic lines of action for our own poses.
When finding the line of action, stay loose! The line must be a continuous flow from one point to the next with a fluid motion as you draw. The idea here is simplification and flow of energy. Can you see how much of a different impact the green and blue lines have compared to the red? Clean, simple and efficient lines!
There could be more than 1 line of action, but a good indication is to place it in areas where the most tension is, or where is the most action in general? Where is the energy flowing?
This exercise will help condition you to think about drawing poses packed with energy, by starting out with your own lines of action.
Shape
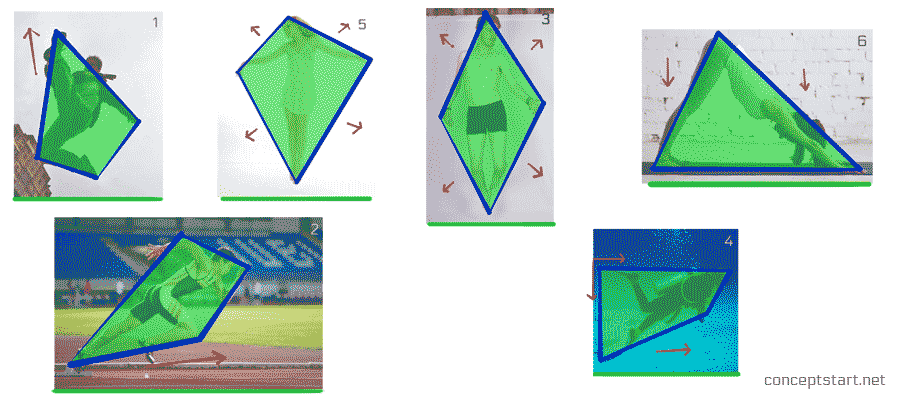
Finding the overall shape of a pose helps to understand the composition of a pose. It works by identifying the main shape that surrounds the pose, through this simplification process; the idea, mood or feeling of the pose should be apparent.
Shape language is a subject in itself which will feature next video. For now you should notice that the shapes of a pose suggest the overall idea of the pose in terms of balance and movement. Is the person resting? Is there fast movement? Is the pose grounded? Is the pose balanced or unbalanced?
To find the shape, don’t focus on details. Look to connect to key points around the figure, and try to capture it with the fewest lines possible. This is a process of simplifying the form.
Obviously, a pose needs context so if we add in the green line we can begin to see the idea more clearly. The red arrow’s help to show the balance and flow of energy based on the more dominant sides of the shape.
So when drawing future poses, consider the base shape of the pose. Does it reflect the overall idea, or feeling that you want to convey? Where is the balance? Where does it feel more weighted?
Silhouette
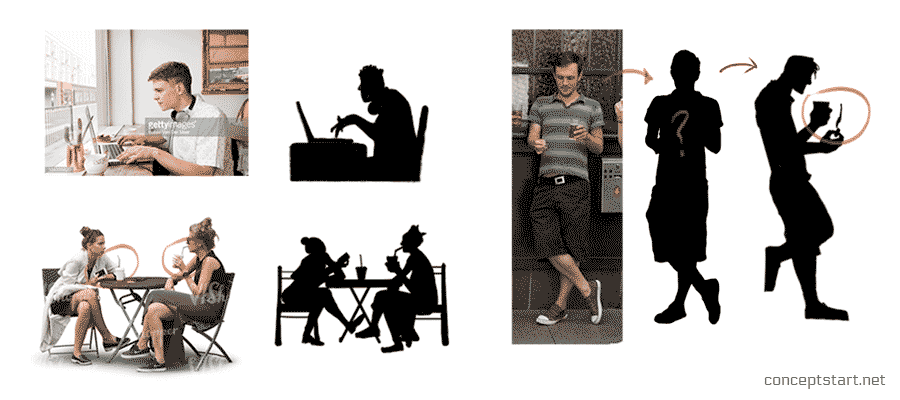
A silhouette is the pose, outline of a person or thing fully blacked out.
When it comes to design, readability and clarity is everything. An image should instantly communicate the idea behind the subject, like the guys in the image... Mickey mouse, innocent and friendly conveyed with rounded shapes. Batman, with his strong and stable figure contrasted with some pointy shapes. Spider Man with dynamic jumping poses unique to him, and the Hulk, who has a unique set of anatomy.
Silhouette is closely linked to shape language, so you might be able to see why these silhouettes help to fortify their character. Silhouette isn’t just about portraying characters though, it’s about conveying a message clearly.
One good way to practice creating strong silhouettes is to take ordinary images, and try to make them more readable. Focus on the main idea and creating a silhouette that best expresses it.
See the image for example, the 2 ladies sitting having a drink. The main idea for me was the phone and the drinks, so I pushed the silhouettes to make sure they read easily.
In many cases a silhouette can’t communicate because the main elements are hidden within the silhouette itself, so stand alone it can’t be read. Ideally, the main idea of a pose should be read through silhouette alone.
Space

An engaging image usually has a good sense of depth to it, so basically the appearance of lots of space from the foreground all the way through to the background.
Creating figure with a sense of space is one of the ways to achieve this depth! A good way to practice is to take existing poses that appear quite flat, or don’t have much space in between the limbs and push or pull them forwards or backwards.
Understanding perspective is important when adding space. An object appears largest the closer is to the foreground, and gets smaller as it recedes into the background!
Adding depth and space to an image will stop it looking flat, and so, when we add depth and space to our figures they become more engaging. It will pull your viewer in!
We can put some additional elements into our figure drawings to really push the depth effect.
The image example at the top is a very basic example, but highlights how you can push and pull the body to create depth.
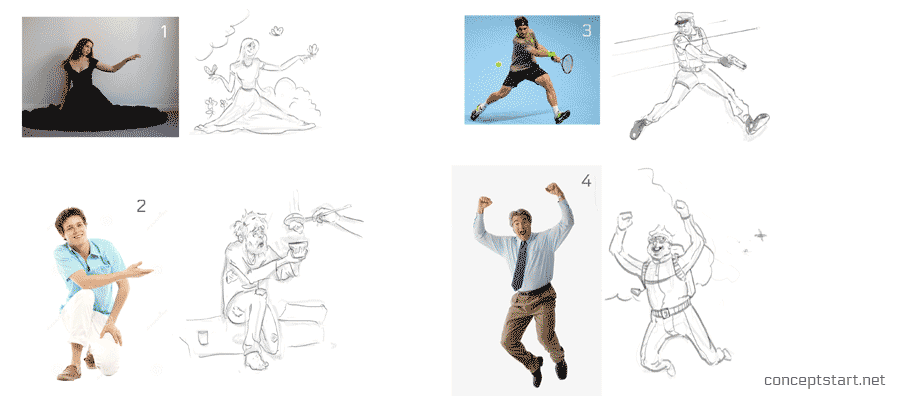
Exaggeration

An exaggerated pose can be highly engaging, it really helps to push forward the idea you want to communicate. Like an actor in a theatre show, they need to be dramatic, their actions need to be visible to everyone in the audience. They do this by making it obvious what they’re feeling, thinking or doing.
I have circled the main idea in the examples to show the idea I wanted to push and exaggerate.
So we need to bring drama to our drawings if we want to engage. A good way to practice dramatic poses, is by taking quite normal images of people and exaggerating them.
This encourages us to always be aware of how we’re posing our characters, and be mindful of how much we’re communicating the main idea to the audience.
Story
This brings us to Story! It’s the most important of all of of these gestural drawing practices, as it pretty much encompasses them all, and more.
It’s the end result of what you want to communicate and get across to your audience. The story idea should be the driving force of the drawing, we can use a combination of the previous techniques to help us get there, but we always need to be asking ourselves who, what, where and why.
We can improve our imaginations and practice being creative storytellers by taking existing images, or poses and use our imagination to position them outside of their original context. The image shows some brief examples of this.
Limit yourself with Time
It's also a good practice to limit the time spent on gestural drawing, try doing 30 second poses! Even if you're drawing from reference, limit yourself with time because this forces you to go off the initial feeling of a pose! You're forced to capture the initial read of a drawing without putting too much though into it.
Human Anatomy Breakdown
The human anatomy is super tough to draw, and you won't memorise it overnight. It'll take many years, but don't worry... there's some fast track ways to learning!
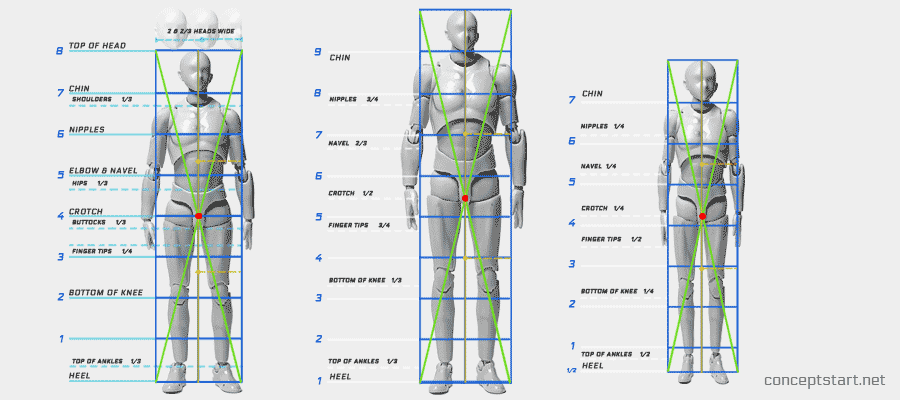
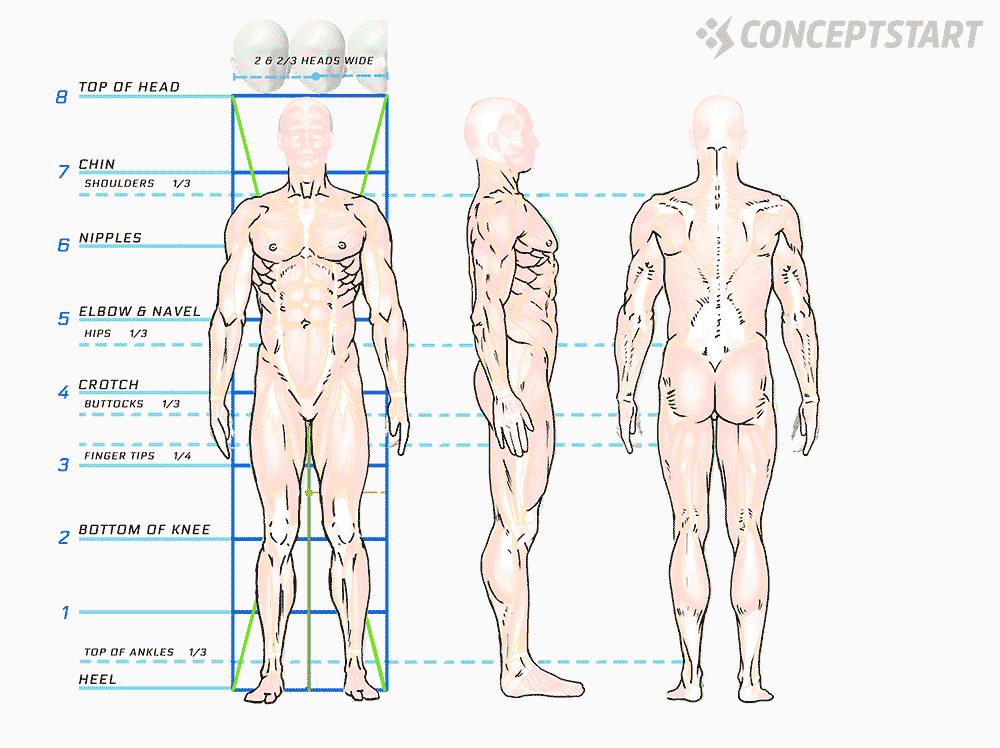
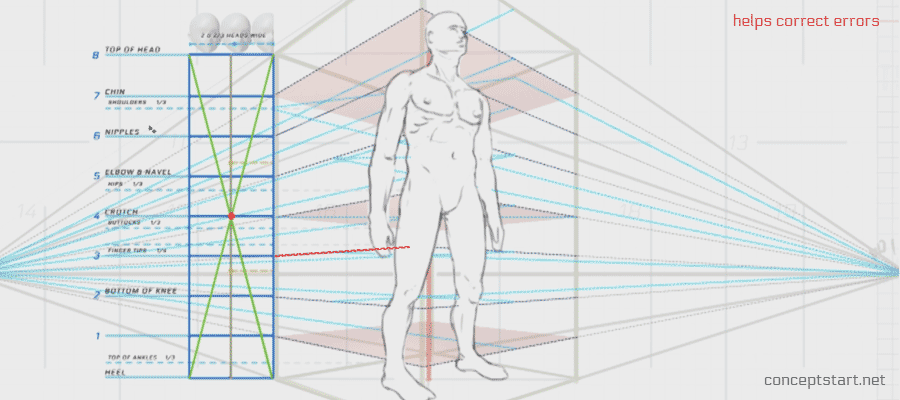
Let's start out with the ideal male, he is 8 heads tall and 2 and ¾ heads wide.
We break it down by dividing the whole body into 8 heads, and then we can understand the relationships between different parts of the body based on ratio. This information will help to ensure the proportions are accurate and well placed when drawing the human figure.
You can see on the grid that from the top of the head we can work our way down and expect certain parts of the body to always be there. For example, the nipples are 2 heads down from the top of the head, the elbows always start 3 heads down and are usually in line with the navel, the crotch always sits at the centre of the figure and so on. You should pause this frame and study it for future reference.
A more heroic body type would be set at 9 heads.
As you can see in the image, this would be the figure of a man that you wouldn’t want to cross! He seems very powerful.
Bare in mind, the relationships change slightly which can be seen on the grid.
At 7 ½ heads we have the average male.
This figure looks very too normal and lackluster. For art and design we like to glorify the figure more.
8 heads is more ideal because the figure becomes more attractive and engaging. Also the body parts appear to be more in sync with the ratio grid which makes it easier to learn. So by learning these relationships we’ll be able to more easily draw the general proportions of a figure, but what about the details and bits in between?
We need to be aware of the underlying structure which is comprised of skeleton and muscle.
Bones, Muscles & Landmarks
The bones and muscles are responsible for the form changes on the surface of the body. As soon as we’ve learned these, we can begin to draw our landmarks correctly which basically suggest parts of the anatomy.
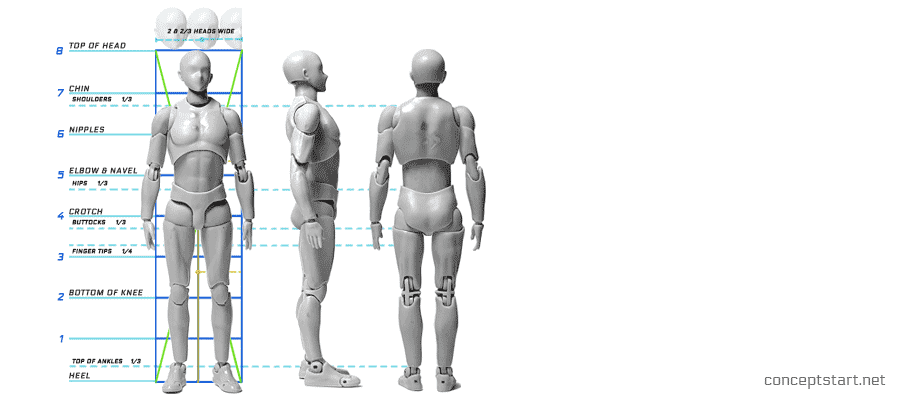
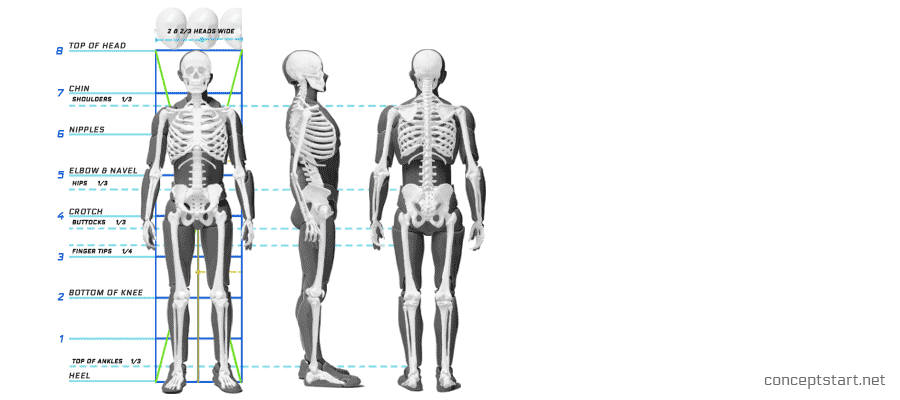
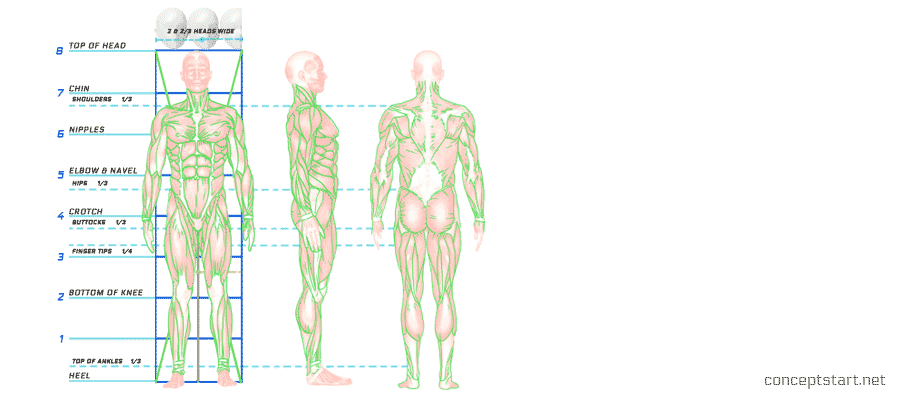
Here you can see how the black landmark lines are established by knowing where the key muscle groups and bones protrude through the surface of the skin. The more prominent features tend to require marks to be made.
Let’s look at the neck area, these lines suggest the hollow and raised areas caused by neck muscles and collar bones. The rib cage and muscles work together to create this scale effect on the chest, and we can also draw lines near where the arm folds just underneath the biceps, lines around the triceps, back muscles and so on.
The landmarks of the body ultimately change based on the angle and motion of the body.
Last week's episode spoke of how the muscles in the skin contract and expand to create lines in the face, and so this principle follows through to the figure. Wherever muscles and bones contract, or expand they usually creates the right conditions for shadows and highlights to appear. Lines are drawn to suggest key areas of shadow and form, which are ultimately determined by the most prominent form changes.

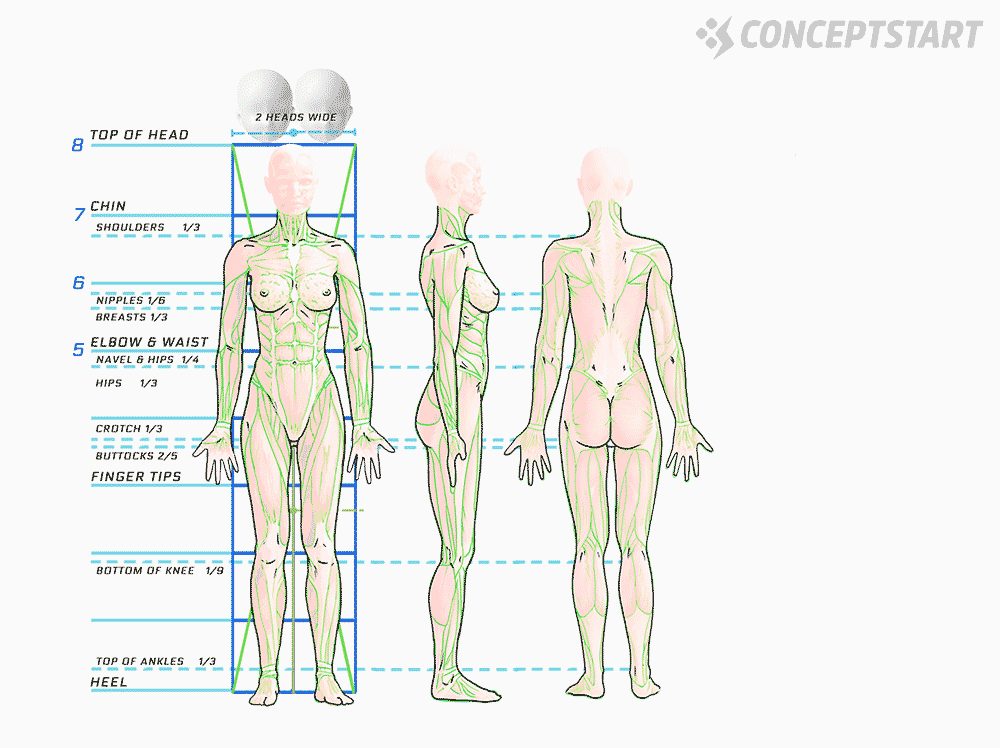
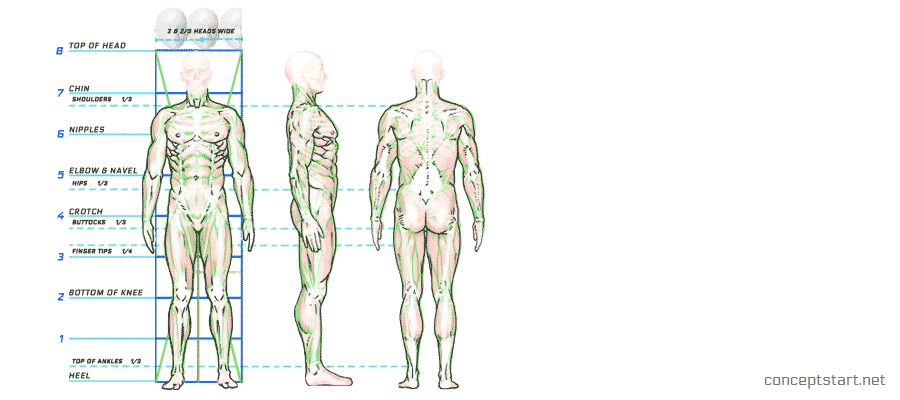
Female are very similar to males with a few key differences. Their shoulders are more narrow with wider hips. And because they’re not so muscular, with less prominent bones, there are generally less landmarks to be drawn in.
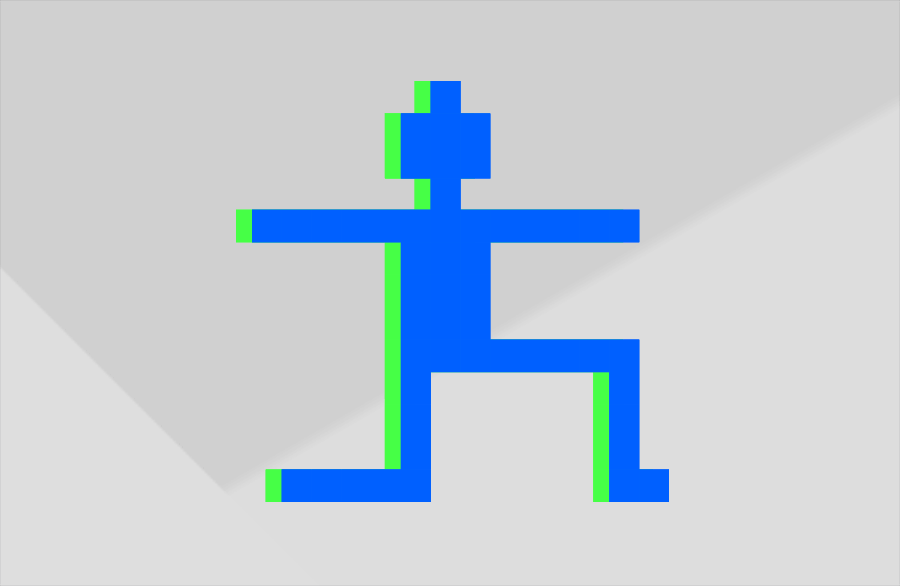
Block Figure Drawing & Comic Pose Practice

Superhero poses are a great base to study figure drawing from because they’re already drawn with a lot of the gestural practices in mind. So it’s good practice to reverse engineer them!
The gesture drawing generator prompts a range of tasks, in the example above I’ve focused on the Block Shapes task.
Comic artists typically draw with stick figures first, and then build around them with geometric shapes to get the overall volume. By drawing over the images, we can see the placement of the base structure and begin to a build visual library in our minds.
The green lines are essentially the bones, the circles are the joints, and the cylindrical blue shapes suggest the are the overall volume for the body parts.
When conducting this exercise, consider the lengths of the lines and shapes, the distances between them, how they’re foreshorten and so on.
Remember to stay conscious when learning! Don’t just mindlessly copy.
Another thing to note is balance! A balanced figure always has a centre of mass down the middle of it like these guys. They look very grounded. If your drawings often look wrong, or like they’re floating and you don’t know why... It could be because the figure isn’t balanced properly.
Drawing Figure Poses in perspective
One of the last things to consider when drawing figures is that a figure should always appear to have some form of perspective.
It should always appear to be grounded in a 3D space. One approach to help you do this is to start with a basic shape with 2 point perspective, and try to fit the figure within it!
The Life Pose generator will not only prompt you with a variety of poses to draw, but it’ll suggest coordinates and placement of your figure within a 2 point perspective setup. Expect to practice a large variety of poses from lots of different angles.
When using this approach for your figure drawings, it really helps to draw a vertical red line in centre of your base shape, this is like a compass point. To find this line, simply draw diagonals from each corner of the top and bottom plane, where they cross is where the end points for your red line goes. Simply connect the points.
This is a great way to practice drawing you figures, as it conditions you to always think of the pose in perspective, which will give you some depth by default!
Conclusion
What’s demonstrated here is basically the Soul and Body of what it is to draw figures.
There’s the emotional state contained within the drawing, you don’t have to be a masterful drawer to create a good drawings. If you can convey a strong sense of emotion and story then people will relate to it. The soul of a drawing is above all the most important.
And then there’s the technical side to a drawing, which is forever a work in practice and will take a lifetime to master. Correct anatomy, proportions and lighting, the technical stuff will also engage through the artistry alone.
The ultimate goal is to combine combine the soul (emotion) with the body (technical ability), at which point you'll be able to create some highly engaging and compelling figure drawings.
Next Steps to Improvement...
Practice Drawing the Human Figure from various angles!
There's a lot to consider when drawing the human figure, but ultimately we should be focusing on the emotional connections and techical ability.
You should practice all of the gestural tecniques outlined in this drawing tutorial, and begin to understand the underlying structure of human anatomy, from bone structure to muscles which will you help you to determine where to draw the correct lines and specific marks that suggest the volumes, body parts and so on. Keep drawing drawing drawing!
Be sure to take advantage of the Gesture and Figure Drawing Task Generator which is free to all during spring and summer!
It essentially prompts you with art based learning tasks, all of which revolved around the key principles outlined in the video included with this Membership. It’ll suggest type of poses, body types and the main task to explore.
There’s also a .PSD file that comes with the generator, so you can basically plot the positions suggested by the generator to help you practice drawing a variety of poses from any angle.
When approaching drawing figures, you should be mindful of:
- The main idea of what you're trying to communicate
- Think to yourself, what's the best way to communicate it
- A full understanding of the bone structure
- A full understanding of muscle groups
- A full understanding of key landmarks for the body
| DRAWING TASKS |
![]() Video Tutorials
Video Tutorials ![]() Task Generators
Task Generators
| GET CRASH COURSE |